Menu:
Machine Learning on the Raspberry Pi
Description
My interest in creating a Blackjack-playing robot led me to machine learning and convolutional neural networks (CNNs). CNNs are a type of neural network made particularly for detecting objects in images by using convolution operations to identify key features. I used TensorFlow, Google’s machine learning framework, to train a custom CNN model that can detect playing cards in a live video feed. This was an improvement over my OpenCV approach because it could detect cards against a noisy background or when the cards were overlapping.
When initially learning TensorFlow, I discovered there weren’t many good resources explaining how to train a custom model for object detection. Feeling frustrated about the lack of easily understandable instructions, I created my own tutorial and published it on GitHub and YouTube. Both the written GitHub tutorial and YouTube video tutorial (shown below) have been very successful and have helped many people train their own object detection models for a wide range of applications.
My end goal for the Blackjack robot is to run it on a Raspberry Pi, so I also learned how to set up TensorFlow object detection on the Pi. At the time, the developers of TensorFlow hadn’t added support for the Pi, so I had to investigate how to compile and install it on my own. I created a YouTube video (shown below) that provided instructions for how to do it. About three months after I published the video, TensorFlow released a Raspberry Pi build on PyPI that made installing TensorFlow as easy as typing “pip install TensorFlow”. However, the video still provides a good example of how to compile and install software packages from source on a Linux system.
The TensorFlow Object Detection API, which allows for object detection (identifying and drawing boxes around objects in images), takes additional work to set up on the Pi. It requires compiling Google’s Protobuf utility, which doesn’t have a PyPI release available for the Pi (yet). I made another video (and a written guide) showing users how to set it up on the Pi. When combined with my initial video on training a custom object detector, this video allows users to turn their Pi into a customizable smart camera that can detect any object.
Finally, I created a "Raspberry Pi Pet Detector Camera” that watches my door and uses object detection to notify me when my pets want to be let outside. I published a video that explains how it works and gives users examples of how to create their own applications using the TensorFlow Object Detection API.
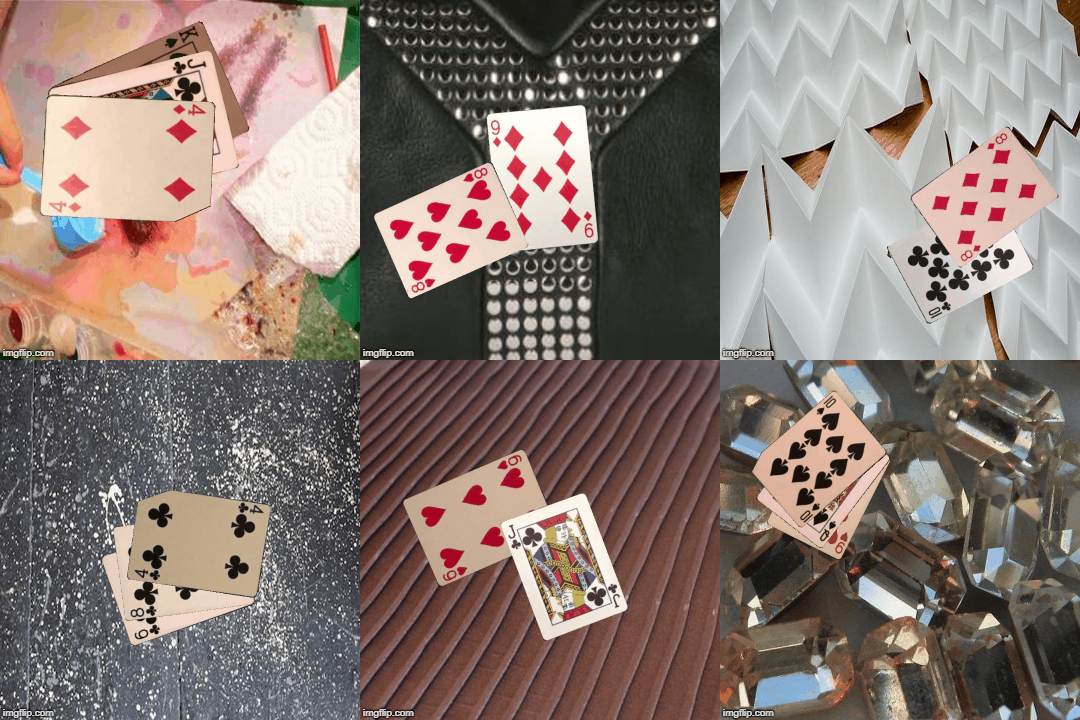
I recently learned how to create synthetic images that can be used to effectively train object detection models without having to manually capture and label images. I used an image augmentation process to create 50,000 training images like the ones shown below. After training on these images (using YOLO rather than TensorFlow), the card detection is extremely accurate. I coded in card-counting functionality and it works like a charm!

Synthetically generated playing card images for training
I am continuing to work on my Raspberry Pi-powered blackjack robot. Now that I have the card detection and card counting figured out, my next step is to create code that will allow it to play through hands of blackjack. I’m very excited about this project and will be posting more videos on it soon!
Project Takeaways
Training my own neural networks and deploying them on the Raspberry Pi has been a fun challenge that has given me significant experience in machine learning. Working on this project has given me experience in the following areas:
- Machine learning: preparing training data, selecting models, training, deploying models
- Python development
- Compiling software from source on Linux systems
- Understanding tradeoffs between using machine learning versus creating an explicit solution (like my OpenCV approach) to achieve desired software functionality
- Understanding the application space for edge devices with low processing power (such as the Raspberry Pi)
- Communicating and documenting deeply technical instructions in a clear manner
- Video production
- Building brand recognition via social media